Home » BMW (Page 19)
Category Archives: BMW
Ah, There’s Your Problem
Well, there’s your problem. Your engine isn’t attached to your car.

I was going to start working on the drive-line today. I know the flex-disk is shot so I got a new one along with the center bearing for the drive-shaft. As long as the drive-shaft is out, I was going to replace the bushings for the shift linkage since it’s easier to get to when the drive-shaft is out.
As I was sitting in the driveway about to pull into the garage, I was thinking there was an awful lot of vibration from the engine. Maybe what I was feeling wasn’t all coming from the drive-line. The engine idles fairly smoothly (for a car with 214K miles) so if there was vibration in neutral, the source had to be something other than the drive-line.
Sure enough, both motor mounts were sheared and the engine was sitting about an inch to the left of center. It was easy enough to get the broken mounts out, but moving the engine back to center to lower on to the new mounts was a bear. I finally managed to get it to swing around and lower back down. Now that the engine is back in the right place, I have to see what else doesn’t line up anymore. Luckily I had some spare mounts in the garage, but that wasn’t how I had planned to spend my day.
8/29/08: Update. I decided to check the transmission mounts today. One was still attached. It’s amazing (or scary) how much more smoothly the engine idles when it’s actually attached to the car.
Stealth: Titled but not Fully Baked

At the end of week three I managed to patch together the broken headlight carrier, install a new headlight and re-aim the beams. I managed to save $50 by repairing the broken carrier. The black wheels look slick. Today I installed the new passenger seat (not pictured) I found on bimmerforums for that $50 I didn’t spend on the headlight carrier.
All-in-all the project is proceeding well, if more slowly than planned. I’m finding each little project takes about twice as much time as I think it should. That’s what happens when you have a 20 year old car I suppose. (Next year it’s “Historic”.) I have to work more on the family/garage balance thing. Too bad I have to go to work. Or sleep….
In Maryland, you have to pass the safety inspection before you can register a car. I got the car titled this week and got a 30-day registration to get it passed inspection. Looking at the inspection list, I think only the non-functioning speedo/odometer is holding me up now. My goal is to get the car ready in more or less stock configuration in time for the next CCA driver’s school 1 August. I think it’s doable.

Stealth: Out with the Old

I’m at the end of the second week of this project and have made some significant progress with only a few (unpleasant) surprises. I secured the battery in the trunk (no brick required) and patched the hole in the fender well from the inside — I still have to finish it off on the outside. I removed the excess trim from the trunk and the electric antenna. That was about 10 lbs. of weight. I replaced all of the light bulbs.

From the interior, I removed the backseats, back seatbelts, stereo, four speakers, some speaker wire, and the center console. Total of about 40 lbs. I also removed one of the two front seats, but I plan to replace that. I fixed and reattached the glove box, removed the annoying key chime, and fitted a new UUC shift knob. I installed a new steering wheel cover. The rotten shift boot is still waiting to be replaced. I relocated the window switches to the dash and found out the reverse light has been disconnected and is on a separate switch now. Now sure why.
Under the hood, I removed the cruise control servo (the brains are long gone); replaced the air cleaner with a K&N cone filter; removed the AC compressor, condensor, evaporator and associated hardware (weight savings alone 25 lbs. fore of the front axle). I replaced the blower resistor and the coil; new oil and coolant caps. I replaced all of the fuses and found a new fuse box cover. I replaced the leaky power steering fluid reservoir and both leaky low-pressure hoses. I cleaned up much of the mess associated with those leaks as well.

The dented right front fender proved to be a bit more complicated than I estimated. I knew I had to fix the front turn signal and replace a headlight, but once I got everything apart, I found the damage was more extensive, but not structural. I removed and replaced the fender liner. Removed the bumper and fixed the turn signal. I removed the air-dam and replaced the fog lamps with blanks (saving a couple of pounds at the very front). Once I removed the grille I found the headlamp carrier was broken. (That’s the one piece on back-order that’s stopping me from registering the car.) I straightened out the interior supporting members so I could rehang the fender. I decided to just pound out the fender and hit it with some paint. It is actually the best painted part of the car now (which says less about the quality of my painting and more about the sorry state of the paint job as a whole).

Since I had the whole front end opened up, I removed the AC and associated parts including the auxiliary fan (which I plan to eventually replace). The fan alone weighs about 5 lbs. Eventually I plan to remove the fan from the engine and run just with an electric fan, but not now. I had Safelight put in a new windshield as well.
As I was waiting for the paint to dry on the fender, I replaced the rotors and brake pads. I have stainless steel brake lines, but don’t have a pressure bleeder so I’ll leave that up to someone else to install. I also installed studs from Turner Motorsports. I bought new Falken Ziex 912s (195/60R14) to go on the stock 14 inch basked weaves. I looked at getting the wheels refinished, but at $40-$50 per wheel for sand blasting alone, I decided instead to just blast them with some paint myself. The photos show the car riding on snow tires as the paint on the wheels hasn’t dried yet.

I’m still hopeful that if the headlight carrier arrives this week, I can get the car inspected and registered to make the next Autocross on the 5th or later in the month on the 20th. With wheel spacers, I should be able to run my MINI autcross wheels. I have replacements for all of the hoses, timing belt, and water pump. I also have a colder thermostat to install at the same time. After that, I think I’ll fix the dubious suspension parts (control arms; tie-rods; bushings; & end-links) before the last track event of the season. That will give me the winter to get the race suspension (springs, shocks, sway bars, camber plates) and roll-cage installed.

Total weight savings so far is about 80 lbs. or just under 3 percent.
F-22 Stealth E30 325is

[Click photo for link to full set of photos on Flickr.]
After months of a low level search of various message boards and Craigslist, I finally found the car I’ve been looking for: a 1989 E30 325is. I finally got to the point where I’m running in the fastest run group on the track and am generally one of the faster cars in the group. With the extra speed came the realization that if I go off the track, I could really mess up my car. Hence the genesis of the idea of a dedicated autocross and track car: The ultimate sleeper car, stripped of anything that doesn’t help it go faster, painted in radar-evading flat black.
I wanted something with about the same power to weight ratio as the MINI, but rear wheel drive (so I can finally graduate from the NCC Instructor Program — besides number of days, I need to do a full lap of oversteer on the skid pad. Tough to do in a front wheel drive car…) I wanted a car that can easily be resold; has lots of cheap parts available; and was relatively inexpensive to run on the track (15 inch wheels mean inexpensive tires; light weight means less expensive brake pads, etc.) I figured on getting a good 325is under $2K; put about $2K into it; sell off all of the parts I take out to reduce weight; and I might break even when I eventually sell it. Worst case is I smack a $4K car; best case is I’m just out the cost of the wear items I would have had to buy for the MINI. Depending on how the engine tests, I may even be able to swap the engine into the convertible, then spend the winter rebuilding the convertible engine for next season in this car. Win win.
So what to do with the car? It’s currently painted in what I like to call, backyard flat black. It didn’t start out that way, but somewhere along the way it picked up a very pad paint job that’s very thick and very oxidized. What I liked about this car was that it had a clean CARFAX report; it was a Florida car for most of it’s life; and all of the body panels match indicating it hadn’t been in any major accidents. The right front fender is a bit messed up, but that appears to be very recent. The engine is very strong and the transmission isn’t a complete pile of goo. I figure it’s a project in about four stages:
Stage 1: Get it registered. I want to keep it street legal so I have to fix up enough to pass the Maryland State Inspection (MSI). Although this program is primarily a jobs program for the shops that inspect vehicles, at least it provides a basic safety baseline. So far, I know I have to replace the windshield, one headlight, and the hole I just found under the battery. We’ll see what else pops up when I drop it off at the local inspection shop. I figure I’ll replace brake pads and rotors all around regardless. You have to know you can stop before you go. Once I get it passed the MSI, I’ll get it dyno’d and weighed to establish a baseline.
Stage 2: Replace known wear items. Since the car sat for several months and I have no repair records, I need to do some preventive maintenance. Replace all of the hoses; flush the cooling and brake systems (stainless steel lines at the same time); replace the timing belt; water pump; thermostat; fan belt; and oil change.
Stage 3: Lose the fat. I’ve actually started some of that as I’m peeling back all of the trim and carpet to see the underlying condition of the chassis, but my intent is to remove anything that isn’t required to go fast. That means trim, carpet, rear seats, rear seatbelts, headliner, sunroof cassette, stereo, speakers, speaker wiring, antennae, center console, etc. I’m hoping I can get 100-150 lbs. out of the car. I want to get to where I can autocross it and take it to the track in August. That should give me a good idea of what the car can do in stock form without any suspension mods.
Stage 4: Improve the suspension and install roll cage. I’m trying to comply with the Spec E30 rules as I mod the car. Not so much because I plan to race, but I’d like to get there eventually. If I stick to one set of rules, it should be easier to sell the car should I need to in the future. By complying with a spec class, it also gives me better way to compare my performance to others over time.
Ooh That Smell
What is that goo that comes out of an electric motor that has seized? We took a brief trip to CA to escape winter and while we were gone, we had some friends watching our house. Because we had some snow and sub-freezing days, we had them run the BMW every couple of days. They must have hit the wiper switch while the wiper blades were frozen to the windshield and not noticed.
The motor burned out after melting its plastic cover. I didn’t notice until I was driving to work and tried to wipe the windshield. Then I noticed that smell. Being a former Alfa owner, it was a smell I knew all too well. At first I thought the heater blower had seized because it’s been on its last legs for a while, but the blower still worked.
Since it’s a real pain to get to the wiper and replace it, here’s how to first trouble shoot, then replace the wiper motor. Disclaimer: instruction provided for entertainment purposes only. Not responsible if it doesn’t work for you or you damage something in the process. No wagering.

1. Disconnect the battery. Check the 30 amp fuse in position #5 in the fusebox.
2. Remove the wiper relay from the fuse panel under the hood (B in the photo above).
3. To test if the problem is the wiring, wiper relay, or wiper motor, you’ll need to test the following in order. To test, you need a piece of 14 gauge (or heavier) wire with a 30 amp fuse and a volt meter.
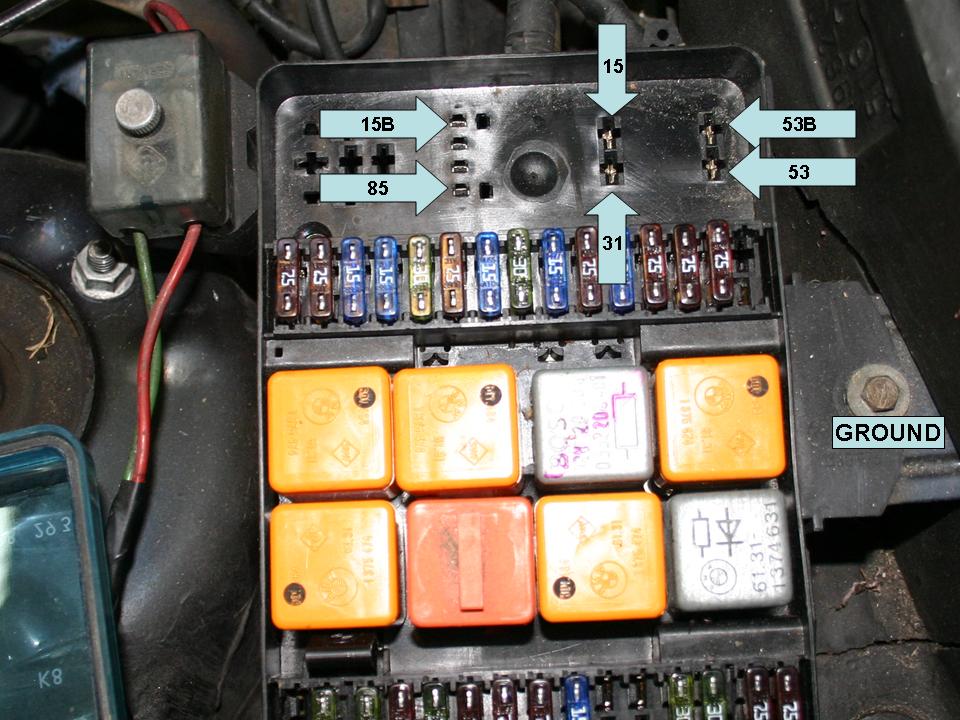
4. Check for power: Reconnect the battery, with the ignition switch turned on, insert one end of your volt meter in slot 15 and touch the other to ground. If voltage is present, check for continuity by switching your volt-meter to continuity mode and check for continuity between #15 and #31. If no power or continuity, you have to fix you wiring before conducting more tests. Check the main ground connection behind the instrument panel if there is no continuity. If you get 12 volts and continuity, move on to the next test.
5. Again with the batter connected and ignition on, use your test wire with the fuse, cross #15 to #53. The wiper motor should run at low speed. Next cross #15 to #53b. The wiper motor should run on high speed. Cross #85 and ground. The washer motor should run. If the wiper motor ran for these two tests, but doesn’t when the relay is plugged in, your fault is with the relay. Congratulations, this is the easiest problem to fix. If both of these tests failed, you have to assume your problem is with the wiper motor. It’s not expensive if you shop around, but it’s a knuckle buster.
6. To get to the wiper motor, you have to remove the heater fan. I was lucky, since I had to replace the heater fan anyway…
7. If you have a strut bar installed, you’ll want to remove it to get to the firewall access panel (A). You will have to loosen the wires that run along the panel (mine were held on with zip-ties.) Then remove the panel by removing the four screws and two nuts.
Remove the blower cover by loosening the white straps, and then easing the cover out the gap in the firewall.

Remove the resistor by pulling up and out. Disconnect the two wires to the blower, and use a screwdriver to pry open the retaining clip. It takes some work, but the fan will come out the opening in the firewall. Now you can concentrate on the wiper motor again. (At this point, most repair manuals recommend removing the rest of the heater duct cover from the heater core, but I managed to remove the wiper motor without doing that or completely removing the wiper linkage.)

8. Next, remove the wiper arms (C) and the cowl vent (D) in the photo at the top. To remove the wiper arms, gently pry up on the cover to expose the linkage bolts. Remove both bolts, washers, and covers. Wrap a screwdriver with tape to protect your paint, and gently pry up on the cowl cover, exposing the wiper motor and cover. Reaching through the opening in the firewall, you can pry the cover off of the motor with your fingers and work it back into the opening in the cowl. You probably won’t be able to remove it until the motor is out.
9. Unbolt the wiper linkage from the car and unplug the wiper motor. At this point, the wiper motor is still attached to the linkage, but the combination is loose in the cowl. Since we are only replacing the motor, we won’t try to pull the linkage out, just separate the motor from the linkage. (If you have to replace the linkage, you have to remove the rest of the heater blower cover to get room to work it out.)
10. Now for the knuckle busting: You’ll have to use a 10mm open end wrench and work blindly. Reaching under the wiper motor, loosen the central nut to the motor. Then remove the 3 10mm bolts that hold the motor to the linkage. Now you can remove the wiper motor out the hole in the firewall and remove the plastic cover if needed (mine was melted.) Be sure to wipe up any remaining “goo” from your melt down, to reduce “that smell…” The photo shows the locations of the bolts you can’t see when installed.

11. Before you start reassembly, plug the relay back into the fuse panel, connect the new motor, and reconnect the battery. Turn the ignition key to position II, and turn on the wiper at the column switch. Turn the switch off and the motor will stop in the “park” position. Disconnect the battery and be sure to slide your new cover into the cowl opening before you try to reconnect everything.
12. Assembly is the reverse of removal.
