Home » Posts tagged 'BMW CCA' (Page 7)
Tag Archives: BMW CCA
Jefferson Circuit HPDE Summit Point 5.30.08
My driving season is split into two parts: there’s the first half that starts once the snow melts and ends when summer swimming starts. The second half picks up after summer swimming and ends around Thanksgiving. This past weekend with the NCCBMWCCA at Summit Point marked the end of the first half. And what a great way to end it. The video shows about a lap and a quarter in the counter-clockwise direction. (The camera mount is too low and it’s a bit overexposed, but it is good for recording corner entry and exit speeds.) It starts mid corner in Turn 7 and ends just after the start finish line a lap later.
Since I started in the Instructor Academy in March, I’ve been taking a day of vacation on Friday and making it a three day weekend at the track. The Friday sessions are great because you effectively double your track time and you get as much time on the skid pad as you normally get in a year of driving events.
I like driving on the Jeff. It’s a very short track and laps tick off rapidly at around 1:04 a lap (counter-clockwise, not that it’s officially timed either way….). You can pick one or two corners and really concentrate on getting them right. Before you know it, you right back at it again.
Here’s what I need to remember for next time. Counter-clockwise:
- Exit the pits, stay off-line to the right, enter turn 1 on the inside and rejoin the line. It’s good practice for when you’re tired and you don’t check that someone is storming down the straight.
- Left-foot brake from turn 2 to through turn 5. Tap the brakes between 2 and 3, try to accelerate in a straight line, but stay to the inside of 3. Don’t swing to the right like the RWD cars. Let the car drift to track center on the exit but don’t go too far out.
- Come in for turn 4, but don’t force the car to the left. Speed is more important than clipping the apex. Don’t get on the apron for the entry to turn 5, there’s a dip and it upsets the car.
- The turn-in to turn 5 is faster than you think. Tap the brakes to begin the turn, don’t bleed off too much, and get on the gas early. Track out but watch the bump on the apron at the edge.
- Stay middle-right on the set up to turn six and carry more speed in to seven than you think at first. You want enough speed so that you don’t have to come off the brakes to make turn in to turn 7.
- Go deeper into turn 7 and trail-brake to get the car to start to rotate. Get on the gas as soon as you’re pointed at the apex. Your best chance to pass is coming out of turn 4 and turn 7. Stay to the left, check gauges and relax. Rinse and repeat.
Clockwise:
- Exiting the pits, stay off-line through turn 7 until you’re sure no one is closing rapidly on you. Turn six is a throw-away in this direction.
- Go deep into turn 5. Use all of the road to the left. Trail-brake when comfortable with speed. Since you’ll be heading up hill out of 5, you can carry more speed than you think. Look through the apex to track-out. Stay off of the apron.
- Tap the brakes to settle the car to turn-in to turn 4. Stay further to the left on turn in and try to straight line the braking zone and make it parallel to the dirt patch at the start of the curb.
- Trail-brake to rotate into turn 3. The braking is hard-medium-hard. Try to straighten out to set up entry into turn 2.
- Straight-line turn 2 as much as possible but don’t ride the curbs. Don’t go all the way to the right to set up for turn-in to turn 1.
- In this direction, turn 1 takes patience, especially in the wet. There isn’t much grip in the dry and you have to be patient. Get the car to turn, get to the apex then get on the power. Turn in too early or power on too early and you’ll have to lift on exit. Your best chance to pass is coming out of 1. Pass on the left.
- Turn 7 is a double-apex with no grip in the middle. There is good grip at the turn-in and about 3/4 of the way through. Hit the first apex, drift out to the middle but hold a steady arc, and come back in to the second apex and that sets you up for turn six. Get the arc right and you’re on full throttle as soon as you’ve made it through the slippery part mid turn. There will be puddles at the second apex in 7 and at the apex in 5 when it rains. Turn 5 has the most grip in the wet. Don’t use it to judge the rest of the track.
Some notes on car set-up:
- I ran F39/R36 lbs cold pressure. This got me 41/38 hot and even temps across all four tires. The outside tires take much more of a beating on this track, but the fact that you can change direction and run both ways really helps with tire wear.
- Tire temps were much closer front to rear than in the past. I take that as a sign that I’m working the rear tires harder and getting the car to rotate more. Some of that is probably due to the increase in front downforce from the splitter. Some (hopefully) from better driving and more trail-braking.
- By effectively doubling my track miles and the increase in speed with the move up to A group, I’m going through a set of brake pads in the weekend. Rotor temps were as high as 650 degrees in the front. I’ve opened up the front to try to get more air in to the wheel well, but I’m going to need to go to a higher temp pad next time. I didn’t notice a lot of fade, but I used 80% of the pad in three days. The once green pad plates look like they’ve been sitting in the gas grill for a while.
- I am going to have to get a RWD car if I ever want to graduate from the skid-pad though. There’s just no way to sustain oversteer as long as they require for the program.
NCC BMW CCA HPDE Summit Point 03.18.08

The new driving season got off to a very good start this past weekend. I participated in the Spring driver’s school with the NCC Chapter BMW CCA at Summit Point, WV. It was my first time in the fastest run group (Group A) and first weekend in the instructor training program. By the end of the weekend, I was holding my own in the run group, but it was a big step up in the beginning.
Since they repaved the main circuit last Fall, it’s a fundamentally different road course — tons of grip and much smoother, but devoid of many visual cues to help with turn-in points and brake markers. They also paved over most of the aprons so there’s very little warning before you run out of road. For me lap times were down almost 10 seconds. About half of that is due to the paving along. Hopefully some of the rest is due to improvements in driving.

Here’s what I need to remember next time I go back so (hopefully) I can pick up where I left off:
- Main Straight. Relax. Check gauges. Remember to tap brakes during the first lap out of the pits. Stay to the right after pit out; left when at speed. Don’t get too close to the left edge due to strong cross winds. Watch for deer. Shift into 5th before the pit out. Top Speed about 120 mph right before the braking zone.
- Turn 1. Brake at about 200 foot mark. Corner entry speed is about 50 mph. Go deep and turn past 90 degrees by the apex. Apex is very late. Look for seam in pavement past the red and white apron. Let the car unwind into turn 2. Don’t think of turns 1 & 2 being a 180 degree turn. It’s more like a 130 degree turn followed by a 50 degree turn.
- Turn 2. Let the car drift toward the dirt past the exit road. Shift into 4th. Line up toward the flagging station at turn 3. Stay to the right of the straight after the turn. Stay on the gas until reaching the braking point for turn 3.
- Turn 3. Fast lefthander. Turn in point is between the two access roads. Look through the apex and turn in when it lines up with the exit point which is in the right kink before the gravel trap. Steady gas through the apex. 70-75 mph in the corner.
- Turn 4. Act of faith. Crest the hill leading into turn 4 around 85 mph. Don’t tap the brakes. May have to lift to get the car pointing toward the apex. Steady gas through the apex. Gas up to braking point, then hard on the brakes. Downshift into 3rd. Trail brake if needed to get tight into turn 5. There’s more grip than you think after turn 4.
- Turn 5. Tight apex. Get left front wheel into the slot between new and old pavement. Let car push to the outside after the apex under steady gas. Then hard on the gas and brake hard in a straight line before turn 6.
- Turn 6. Tight apex and let car drift all the way to the other side of the track. Steady gas. Point car toward the silo.

- Turn 7. May have to lift to get the car tucked into the apex, but have to get the right line or else will blow 8 and 9. Steady gas. Shift into 4th as the car transitions right to left. Steady tire noise.
- Turn 8. Watch for standing water on the left. Steady gas. Set-up for 9. Smooth transition.
- Turn 9. Watch for mud on the inside. Steady gas. Let the car drift out, but in the damp don’t drift too far to the left. The left is off-camber and will throw you off track if you lift. Line up to cross under the bridge on the right third of the road. Steady gas to the top of the hill, will be on the rev limiter in 4th gear, but don’t shift. Top speed 100 mph.
- Turn 10. Watch for water at the braking zone and turn-in. Light on the brakes in the dry. Slow car to 70 for the turn-in. Look for scallop in paving on the left, that’s the turn in point. Full gas through the apex and stay on it. Let the car drift out to the exit and stay on full gas to the braking point for turn 1.
- Rinse & repeat.
Ooh That Smell
What is that goo that comes out of an electric motor that has seized? We took a brief trip to CA to escape winter and while we were gone, we had some friends watching our house. Because we had some snow and sub-freezing days, we had them run the BMW every couple of days. They must have hit the wiper switch while the wiper blades were frozen to the windshield and not noticed.
The motor burned out after melting its plastic cover. I didn’t notice until I was driving to work and tried to wipe the windshield. Then I noticed that smell. Being a former Alfa owner, it was a smell I knew all too well. At first I thought the heater blower had seized because it’s been on its last legs for a while, but the blower still worked.
Since it’s a real pain to get to the wiper and replace it, here’s how to first trouble shoot, then replace the wiper motor. Disclaimer: instruction provided for entertainment purposes only. Not responsible if it doesn’t work for you or you damage something in the process. No wagering.

1. Disconnect the battery. Check the 30 amp fuse in position #5 in the fusebox.
2. Remove the wiper relay from the fuse panel under the hood (B in the photo above).
3. To test if the problem is the wiring, wiper relay, or wiper motor, you’ll need to test the following in order. To test, you need a piece of 14 gauge (or heavier) wire with a 30 amp fuse and a volt meter.
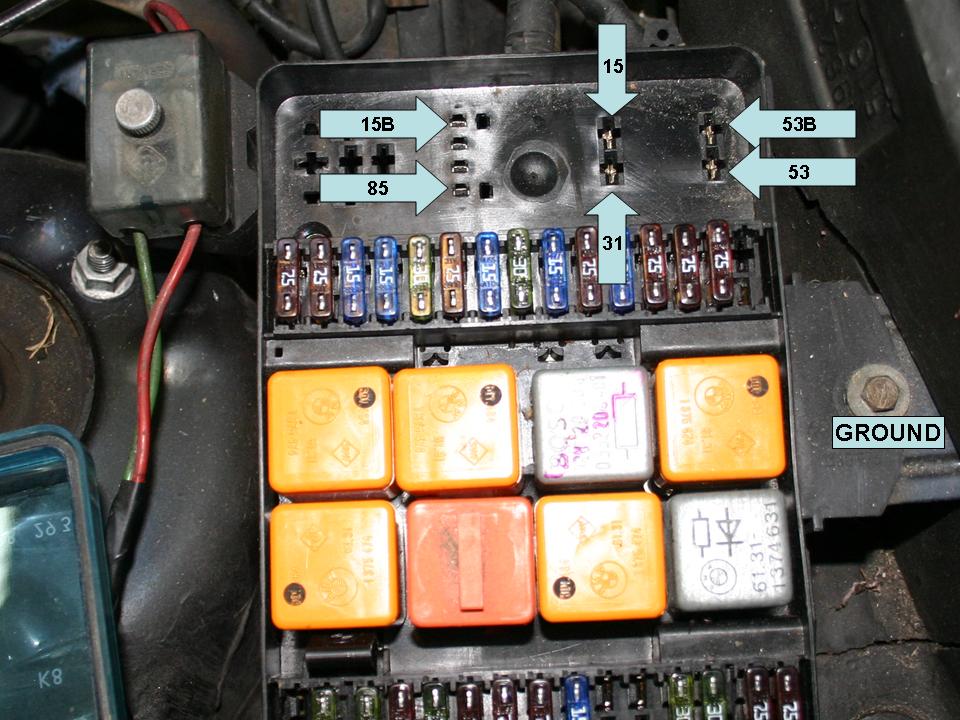
4. Check for power: Reconnect the battery, with the ignition switch turned on, insert one end of your volt meter in slot 15 and touch the other to ground. If voltage is present, check for continuity by switching your volt-meter to continuity mode and check for continuity between #15 and #31. If no power or continuity, you have to fix you wiring before conducting more tests. Check the main ground connection behind the instrument panel if there is no continuity. If you get 12 volts and continuity, move on to the next test.
5. Again with the batter connected and ignition on, use your test wire with the fuse, cross #15 to #53. The wiper motor should run at low speed. Next cross #15 to #53b. The wiper motor should run on high speed. Cross #85 and ground. The washer motor should run. If the wiper motor ran for these two tests, but doesn’t when the relay is plugged in, your fault is with the relay. Congratulations, this is the easiest problem to fix. If both of these tests failed, you have to assume your problem is with the wiper motor. It’s not expensive if you shop around, but it’s a knuckle buster.
6. To get to the wiper motor, you have to remove the heater fan. I was lucky, since I had to replace the heater fan anyway…
7. If you have a strut bar installed, you’ll want to remove it to get to the firewall access panel (A). You will have to loosen the wires that run along the panel (mine were held on with zip-ties.) Then remove the panel by removing the four screws and two nuts.
Remove the blower cover by loosening the white straps, and then easing the cover out the gap in the firewall.

Remove the resistor by pulling up and out. Disconnect the two wires to the blower, and use a screwdriver to pry open the retaining clip. It takes some work, but the fan will come out the opening in the firewall. Now you can concentrate on the wiper motor again. (At this point, most repair manuals recommend removing the rest of the heater duct cover from the heater core, but I managed to remove the wiper motor without doing that or completely removing the wiper linkage.)

8. Next, remove the wiper arms (C) and the cowl vent (D) in the photo at the top. To remove the wiper arms, gently pry up on the cover to expose the linkage bolts. Remove both bolts, washers, and covers. Wrap a screwdriver with tape to protect your paint, and gently pry up on the cowl cover, exposing the wiper motor and cover. Reaching through the opening in the firewall, you can pry the cover off of the motor with your fingers and work it back into the opening in the cowl. You probably won’t be able to remove it until the motor is out.
9. Unbolt the wiper linkage from the car and unplug the wiper motor. At this point, the wiper motor is still attached to the linkage, but the combination is loose in the cowl. Since we are only replacing the motor, we won’t try to pull the linkage out, just separate the motor from the linkage. (If you have to replace the linkage, you have to remove the rest of the heater blower cover to get room to work it out.)
10. Now for the knuckle busting: You’ll have to use a 10mm open end wrench and work blindly. Reaching under the wiper motor, loosen the central nut to the motor. Then remove the 3 10mm bolts that hold the motor to the linkage. Now you can remove the wiper motor out the hole in the firewall and remove the plastic cover if needed (mine was melted.) Be sure to wipe up any remaining “goo” from your melt down, to reduce “that smell…” The photo shows the locations of the bolts you can’t see when installed.

11. Before you start reassembly, plug the relay back into the fuse panel, connect the new motor, and reconnect the battery. Turn the ignition key to position II, and turn on the wiper at the column switch. Turn the switch off and the motor will stop in the “park” position. Disconnect the battery and be sure to slide your new cover into the cowl opening before you try to reconnect everything.
12. Assembly is the reverse of removal.
Bottlecap Wheel Refresh

One thing that drives me nuts about the “bottle cap” rims is that they’re impossible to clean. If you leave the brake dust on the wheels it eats into the surface and you cannot really get your fingers in the slots to keep them clean when you wash the car.
Since I had a little time off around the 4th of July, I thought I’d repaint the wheels and apply a more durable clear coat that’s supposed to resist high heat and brake dust. If nothing else, for a brief period they will be clean and dust-free. The photo above shows the worst wheel of the set. I’m not sure how the previous owner got that gash in the wheel, but at least it’s on the thickest part of the rim (knock on wood).
I have another set of the same wheels with snow tires on them. At some part I’ll swap this one out, but for now, it looks much better. From 10 feet away you can’t even see it. And that’s the goal of this car anyway — a decent 10 footer.

And the set.

All in all, pretty good for a couple of days of work and about $20 in paint.

Convertible Paint Finished

I talked to the experts at Paint World and upon their recommendation, added a third coat of clear to the hood. That made all the difference to get the repainted hood to match the shine of the fenders. I had some paint and clear coat left over so I also repainted the rear panel around the taillights and license plate. Considering I only got a single coat of primer, single coat of color, and single coat of clear on the rear, it looks pretty good.

We’ve had the car for just over a year now. Here’s what the hood looked like when I started:

And here’s the rear panel:

