More Home Depot Racing Parts
I have always hated exterior bits that serve no real purpose. Faux brake vents; solid grilles — that sort of thing. The stock MCS rear bumper has two fake grilles that have always driven me nuts. With the way the bumper cover is designed, the rear valance hangs down in the airflow coming under the car. It always looked like you could just open up the grilles and let the air flow through the bumper. But things are never as easy as they seem.
The first thing you notice when looking at the rear of the car is that there is a lot of heat shielding. With the stock “2-ball” design, this made sense, but once you’ve converted to a single sided exhaust, you really do not need all of that shielding or the exhaust hanger on the unused side. Once I painted the new bumper, I thought I’d try to experiment with airflow through the bumper. I started by modifying the heat shielding on the exhaust side to flow better toward the outlet. On the driver’s side, I trimmed the heat shielding back and channeled the airflow directly toward the vent. I’ve been running without vents at all for a couple of months. From most angles, you really can’t tell anything is missing, but when you are directly behind the car, it just looks wrong.
I tried looking through the usual online catalogs for a low cost, free venting solution, but all seemed outrageously priced to me. Enter Home Depot. Since I had an extra set of vent grilles, I decided to break out the jig saw and dremmel and see what I could come up with. After a couple of experiments, here’s what I produced. It’s not going to win me any concourse competitions, but from 5 feet, they look pretty good. They are made from the same gutter-guard material as my front grille, so it provides a certain low-budget symmetry I should think.

Give in to the Dark Side

I mounted the new autocross wheels stepped back, and it struck me how much darker my car has become. Not that it’s a bad thing, just sort of a slow change over time. Tinted windows, blacked out grille, and now black racing wheels. Add mirror caps and a roof sticker and the change will be complete.

I wanted to see if the wheels would rub, so I carefully drove down the street, avoiding any water or ice since they are basically slicks. I was looking for a good place to check for rubbing. I found an empty church parking lot and did a couple of quick tight turns. (Am I going to hell for doing donuts in the church parking lot?)
JDM Super Tuner Lug Nuts

It turns out that my new Konig Feather wheels won’t work with the stock size lug nuts. They require “tuner” nuts. Who knew such a thing even existed? So now I have my first ever JDM parts.

At the widest point, the Muteki nuts are about 1/16 of an inch smaller in diameter than the stock lug nuts. This allows the nut to fit in the narrow hole of the Konig wheel. They have a narrow, barrel design that requires a special socket to be used. I figured it was a good idea to get an extra nut and spare socket since it’s non-standard. If you look carefully at the stock nut, you can see a line that is the limit of where it makes contact with the wheel. It looks like the amount of surface area in contact will actually be the same for both nuts which is good news.
Ooh That Smell
What is that goo that comes out of an electric motor that has seized? We took a brief trip to CA to escape winter and while we were gone, we had some friends watching our house. Because we had some snow and sub-freezing days, we had them run the BMW every couple of days. They must have hit the wiper switch while the wiper blades were frozen to the windshield and not noticed.
The motor burned out after melting its plastic cover. I didn’t notice until I was driving to work and tried to wipe the windshield. Then I noticed that smell. Being a former Alfa owner, it was a smell I knew all too well. At first I thought the heater blower had seized because it’s been on its last legs for a while, but the blower still worked.
Since it’s a real pain to get to the wiper and replace it, here’s how to first trouble shoot, then replace the wiper motor. Disclaimer: instruction provided for entertainment purposes only. Not responsible if it doesn’t work for you or you damage something in the process. No wagering.

1. Disconnect the battery. Check the 30 amp fuse in position #5 in the fusebox.
2. Remove the wiper relay from the fuse panel under the hood (B in the photo above).
3. To test if the problem is the wiring, wiper relay, or wiper motor, you’ll need to test the following in order. To test, you need a piece of 14 gauge (or heavier) wire with a 30 amp fuse and a volt meter.
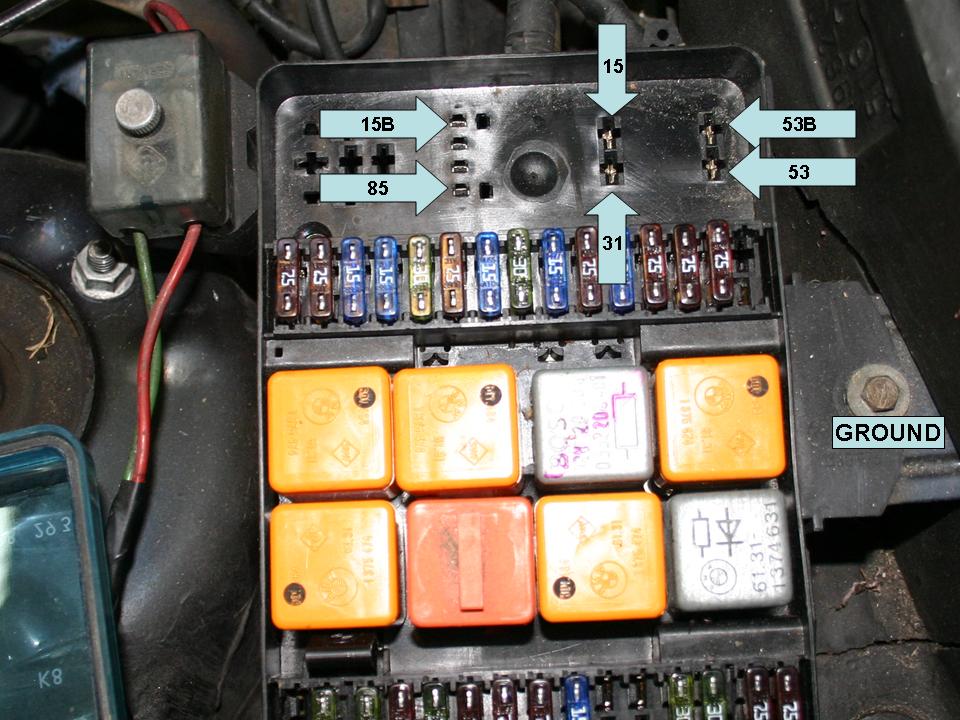
4. Check for power: Reconnect the battery, with the ignition switch turned on, insert one end of your volt meter in slot 15 and touch the other to ground. If voltage is present, check for continuity by switching your volt-meter to continuity mode and check for continuity between #15 and #31. If no power or continuity, you have to fix you wiring before conducting more tests. Check the main ground connection behind the instrument panel if there is no continuity. If you get 12 volts and continuity, move on to the next test.
5. Again with the batter connected and ignition on, use your test wire with the fuse, cross #15 to #53. The wiper motor should run at low speed. Next cross #15 to #53b. The wiper motor should run on high speed. Cross #85 and ground. The washer motor should run. If the wiper motor ran for these two tests, but doesn’t when the relay is plugged in, your fault is with the relay. Congratulations, this is the easiest problem to fix. If both of these tests failed, you have to assume your problem is with the wiper motor. It’s not expensive if you shop around, but it’s a knuckle buster.
6. To get to the wiper motor, you have to remove the heater fan. I was lucky, since I had to replace the heater fan anyway…
7. If you have a strut bar installed, you’ll want to remove it to get to the firewall access panel (A). You will have to loosen the wires that run along the panel (mine were held on with zip-ties.) Then remove the panel by removing the four screws and two nuts.
Remove the blower cover by loosening the white straps, and then easing the cover out the gap in the firewall.

Remove the resistor by pulling up and out. Disconnect the two wires to the blower, and use a screwdriver to pry open the retaining clip. It takes some work, but the fan will come out the opening in the firewall. Now you can concentrate on the wiper motor again. (At this point, most repair manuals recommend removing the rest of the heater duct cover from the heater core, but I managed to remove the wiper motor without doing that or completely removing the wiper linkage.)

8. Next, remove the wiper arms (C) and the cowl vent (D) in the photo at the top. To remove the wiper arms, gently pry up on the cover to expose the linkage bolts. Remove both bolts, washers, and covers. Wrap a screwdriver with tape to protect your paint, and gently pry up on the cowl cover, exposing the wiper motor and cover. Reaching through the opening in the firewall, you can pry the cover off of the motor with your fingers and work it back into the opening in the cowl. You probably won’t be able to remove it until the motor is out.
9. Unbolt the wiper linkage from the car and unplug the wiper motor. At this point, the wiper motor is still attached to the linkage, but the combination is loose in the cowl. Since we are only replacing the motor, we won’t try to pull the linkage out, just separate the motor from the linkage. (If you have to replace the linkage, you have to remove the rest of the heater blower cover to get room to work it out.)
10. Now for the knuckle busting: You’ll have to use a 10mm open end wrench and work blindly. Reaching under the wiper motor, loosen the central nut to the motor. Then remove the 3 10mm bolts that hold the motor to the linkage. Now you can remove the wiper motor out the hole in the firewall and remove the plastic cover if needed (mine was melted.) Be sure to wipe up any remaining “goo” from your melt down, to reduce “that smell…” The photo shows the locations of the bolts you can’t see when installed.

11. Before you start reassembly, plug the relay back into the fuse panel, connect the new motor, and reconnect the battery. Turn the ignition key to position II, and turn on the wiper at the column switch. Turn the switch off and the motor will stop in the “park” position. Disconnect the battery and be sure to slide your new cover into the cowl opening before you try to reconnect everything.
12. Assembly is the reverse of removal.
M7 Scoop & Feather Wheels
Since I had the respirator out and the garage all in “spray-booth” mode, I went ahead and painted the M7 Extreme Scoop I bought last Fall. I’m not sure it actually improves performance of the inter-cooler at all, but it seems like it does according to the butt-dyno.

My cunning plan for this autocross season is to run a set of Kumho V710 225/50/15s on Konig Feather wheels. The wheels finally came last week and now I just need to get the tires shoe-horned on the rims and see if they will fit without wheel spacers.


The Wheels are about 12 lbs. each and “the Light-Weight-Oriented wheel is produced by excellent design and with great precision, technology and manufacturing method for limited merchandise in solid structure and ultra light weight.” [tag on each wheel] Who can argue with that? Update: Here they are mounted. Now to find some bolts that fit…
